Growing and Caring for Your Own Aloe Vera Plant
I guess, in many respects, this is the most important page on the site. If you can't grow Aloe for love nor money, then you can always stock up on the chemist or supermarket stuff, or even worse, Holland and Barrett.There is only one rule that is more important than anything else when it comes to caring for your Aloe Vera:
Rule 1: YOU KEEP YOUR ALOE OUT OF THE FROST, AND LET GOD DO ALL THE WATERING!
Rule 2: IF YOUR PLANT STARTS TO LOOK A LITTLE BROWN (sun damage), MOVE IT INTO THE SHADE
Follow that simple advice and you will have a happy plant that will thrive, and grow, and get strong, and give you a good 20 years of life as well as hundreds of healthy leaves to use for yourself and your family.
Is it easy to grow Aloe Vera?
Yes, as easy as weeds showing up in your garden. However, as aloe is not native to the UK, there are one or two considerations you will need to be aware of, to give yourself and your aloe the best chance of success. With that aim, your plant will come with a growing tips sheet and all the information you will need to grow it on successfully. There are also instructions on gel usage and harvesting.
Please be aware that if you don't follow this procedure carefully, your plant leaves can fall out from the centre of the plant and SNAP OFF while you are transplanting it. Aloe leaves are heavy with gel and therefore not very flexible. Sudden shock movement or excessive movement can cause them to break. A snapped leaf can be used first and the gel will seal over ensuring no lasting damage results to the plant.
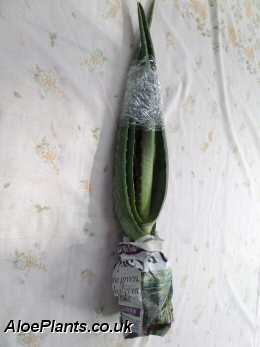 Carefully remove the plant from the postal box |
 Unwrap the roots, but leave the leaves bound for now |
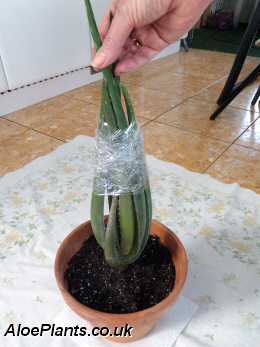 Plant your Aloe Vera in the pot you prepared earlier |
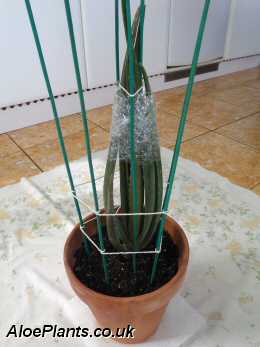 Place sticks around the plant and wrap string around the sticks to create a support structure |
 Gently snip down the clingfilm wrapping being careful not to damage any of the leaves |
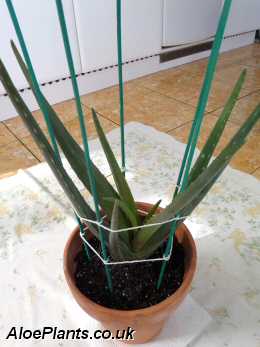 Allow the leaves to rest against the string and position them naturally so they are supported |
Allow your plant to remain within this support structure for several months while the roots spread throughout the compost and create a strong web of roots to support your plant in this position. Taking these precautions will ensure your plant pots up successfully and does not suffer transplant stress unduly.
So what will I need?
A pot. Some cactus compost. Perlite. Some garden soil. Dry, clean sand (not sharp or salty). Your plant. If you've never potted anything before, ask someone to show you. If you are a seasoned gardener, most of this will be academic, sorry.
The Method:
Blimey, it's like being back at school, isn't it? Choose a pot (plastic or clay) that will give you around 3" of space between your plant in the centre and the edge of the pot. This is a rough guide, as you can use a smaller or larger pot depending on what you have available. So if your plant is an inch across the base, you could use a 6-7" pot. This will give the plant growning room throughout the summer. If you are planting in the winter, a 5" pot is ample because the plant will need to settle in, but will not grow much overwinter.
The main reason for proper pot size is that you want the plant to use up the compost. Compost will stagnate and harbour bugs, or worse, mould, if it is not used and has something vibrant and alive coursing through its fibres. It has something to do with chemical changes and air exchange, but don't ask, as I'm not a scientist. But if you've ever had something disease and die because you put a tiny plant in a big pot, that's probably the reason.
 Some people like to put grit in the bottom of the pot for drainage, and if you do, about half an inch is ample. Personally, I just use a small egg cup full of perlite, that's if I bother. But when I do, I also lay a single layer of kitchen roll, or newspaper in the bottom first, so the perlite or compost don't come flying out of the pot holes everytime I move it.
Mix your compost. If you have a proprietary brand of cactus compost, it will have sand and grit in it already. Mix in a small amount of perlite, just making enough to fill your pot. You should be ready to go.
If you are mixing your own compost from scratch, roughly measure your compost 40%, sand 30%, perlite 15%, garden soil 10%, grit 5%. Mix this altogether and see what it looks like and what it feels like. Add a little water, mix again, and test again. Does it feel crumbly? Are you getting clumping? If it feels like there's no substance, add a little compost. If it feels 'sticky', add a little more sand/perlite.
Place compost into your pot to about three quarters, or more, and use a finger to force compost against the side of the pot bigger than the hole you need for your plant. Place and hold your plant in this hole and tease the compost towards the roots. Still holding the plant in place, add finger fulls of compost around the plant, firming gently as you go. Add compost until you reach the base of the first leaf. NEVER bury your Aloe leaves in the compost, they should be clear of the floor of the compost.
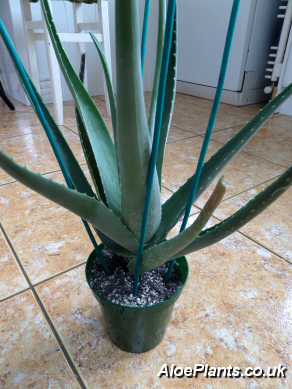
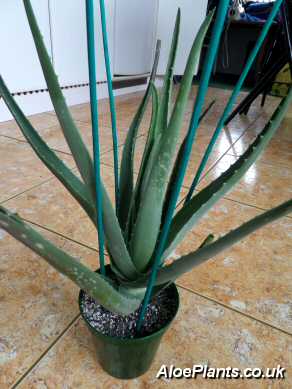 If your plant has masses of roots, this should be enough to hold it in place, and the job is done. If you had less root, this will not be a problem to the plant in the long term, but it can make it a little unstable until it grows a new root set. For this you can use some small thin sticks to just push into the compost and lean against the plant. Usually a minimum of 3 sticks are needed to triangulate the support and hold the plant upright. You do not need to tie it, just allow the plant to rest against the sticks until it can support itself, usually after a couple of months of growth.
These pictures on the right show how to support your plant with sticks until it grows a strong root set. This applies to small and large plants. ➜
Which garden soil is best?
That's difficult to say. Mine is perfect because I live on the side of a hill. The soil here is crumbly, not much clay, doesn't swell when wet, and not much good for anything anymore after hundreds, maybe thousands of years of leaching of any goodness down to the valley below. That's why it's perfect for Aloe's and why I struggle so much to grow even basic vegetables. Still, that's a side issue.
When I lived on the Somerset levels, that would have been pretty hopeless too because the soil is reclaimed from the sea and is deep, thick, hard clay. I'm sure there are many areas of the country where the soil is rubbish, but equally so, even more where it is rich and fertile.
One thing I discovered about 5 years ago now, mole hills have BEAUTIFUL soil. It is the nearest thing I can find to my own soil. So if you know anyone who has a mole problem, ask for a bucket or so of the mole hill soil. Quite why it's so good, I don't know, but I am guessing it's because it's from far down in the ground and has been undisturbed for a long time. Curiously it rarely has any weeds in it.
This can be mixed with compost, sand and perlite, to make a free draining mixture with a good deal of goodness ready for the plant to take in. Perlite and sand, make air gaps in the soil that helps the plant to take up these nutrients, without sitting in water.
These are a few things you need to remember:-
- Water your Aloe from the tray or saucer, not the top.
- If you keep your potted Aloe in a saucer or tray; never leave water in the saucer or tray five minutes after watering. I see it all the time; a soaked plant sat in a saucer overflowing with water, and there is sits for hours or even days, and they wonder why it's not flourishing. Well its not a bleeding water lily!
- If you water from the top, use a basting tube, or similar, and 'place' the water away from the central core of the pot. Allow it to soak in before adding more. Water that runs toward the central core of the plant will be held there and may start to rot the outer leaf or leaves.
- Overwatering an Aloe plant is the surest way to kill it. If in doubt, don't!
- Aloe can take moisture from the air. In most situations Aloe are quite robust and it is difficult to kill them completely, except by too much water. Even if one looks sick for a while, a new shoot will come up and off it will go again.
- A rotting Aloe is always going to be a watering problem.
- Use fertilizer sparingly and weaker than the manufacturers recommendations. Enclosed compost can become very 'fertilizer HOT' in a short time because of drying out and chemical concentration.
If your plant is looking very dark green, or brown, or even a browny orange, IT IS GETTING TOO MUCH SUNLIGHT! Quite how that is possible in the UK is anybody's guess, and is more the mystery when you consider where these plants come from in the first place. Move it to some shade, or even cover it completely with fleece, old net curtain, or a sheet of newspaper, and within 24-48 hrs you should notice it start to go green again. No harm done.
Oh yes, with regard to the previous point I almost forgot; The browning is due to Ultra Violet damage in the UK sunshine, not the amount of sunlight at all. That's why moving it to a shadier position brings it back to green.
The tips of my leaves are going yellow/orange, what should I do?
Nothing, the plant is just settling in. These tips will dry up and shed back to a healthy part of the leaf. Or, you can snip off the tips just at the base of the dried up bit and the plant will look pleasing and remain healthy.
Have we had a frost, or some cold weather, and are the leaves touching the window glass? If yes, then the tip of the leaf has gotten chilled and the plant will sacrifice it rather than infect the whole plant with the damaged leaf. Keep Aloe above 5 degrees C at all times. It will not survive the darkest, frosty, UK winter temperatures without some form of heat.
I've done the silly thing and over watered my plant. I think it has started to rot at the stem and some of the leaves are going slushy. Is there anything I can do?
Yes, stop watering it! This is most likely the cause. The frequency of watering and where you water is the key. Compost that may appear dry on the surface, can be saturated below. This is confusing to the gardner because if the compost looks dry, we usually assume this is throughout its depth, which is a mistake.
The opposite is also true. When you water your greenhouse for the first time in the spring, you have to water gallons and gallons even to make an impression. Otherwise you are planting in dry ground. Try it and see! Water what you think is a good soaking, and then take a trowel and scrape away the surface. An inch below ground is as dry as a crisp.
But later on in the summer when the surface looks dry, do the same trowel scrape and you will see that an inch below is still quite wet. It's just the surface that dries. Anyway, I'm just trying to show you that the same thing goes on in a flower pot, which will sometimes surprise you when you come to repot what you think is dry, only to find the compost is still moist.
The repair here will depend on the size of the pot. Now you could repot your Aloe and resolve not to make the same mistake again. Add a little extra sand to the mix and you're all done.
If the pot is big, and you have a large compost surface to work with, the solution is to bore down into the compost with a piece of pipe and extract a core of compost from the pot. Choose a spot halfway between the plant and the edge of the pot. Make four holes around the compost surface all roughly equidistant apart, and try to go all the way to the bottom of the pot. Extract the compost. Now you will damage a root or two during this process, but enough will survive not to harm the plant unduly.
If I can set this up, I may take photographs of this process and put them here to make it easier. I would use a piece of 15mm copper pipe to make the holes, but you can use a bamboo cane or something similar if that's what you have. Now you need some childrens 'play sand'. Not much, but enough to fill the holes to the surface. Play sand is very dry, free flowing, washed, sifted and incredibly fine. Just fill each hole to the surface of the compost, and you're done.
Now, anytime you water, or if the plant is outside, it rains, the water will soak away from the plant and keep it just right with the correct moisture.
If your pot is rather smaller, then use a lolly pop stick or back of a spoon and gently pull the compost away from the base of the plant as far down as you can go without damaging the roots. Remove the compost, clean off the stem and any compost that gets between the leaf and stem. Make space between the plant and compost of at least half an inch and preferably a little more.
Once again replace this compost with the 'play sand' sand by pouring it into the hole. It needs to be play sand, not the stuff from the beach which is too salty. Ensure that you only have sand against the side of the plant, not compost.
Place small sticks or mini-bamboos in the compost and prop up the plant on all sides, so that it can continue to grow strong roots and hold itself in place. Leave it to recover, which will likely take some time now. Any future watering must be from the bottom of the plant in the pot dish, not from the top. This will dry out the upper compost which has likely been too wet against the plant.
How did you get this rather bizarre repair idea?
This is exactly what I did when something similar happened to me last year. I left several very large Aloe's out against the base of a sunny wall, and that night we had a massive rainstorm which overflowed the gutter above one of the plants. I hadn’t realized and several days later it started to display that dreaded 'spongy' look and feel. This procedure brought it right back to health in a very quick time, and it is still alive today, still with it's little columns of sand in the compost, but it has now grown so big, it takes up a whole chair sized area all by itself.
If you order your plants from me, here's an idea of what you'll be getting?
These are pictures of the Aloe's I send out, compared to the specimens you'll often get on Ebay or Gumtree. I offer this so you can buy with confidence. I always try to do better than expectation. Thank you for your custom.
These are my large aloe vera plants compared to normal grocery items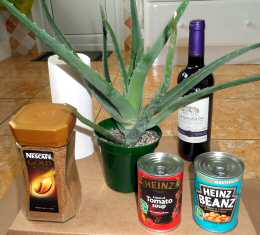 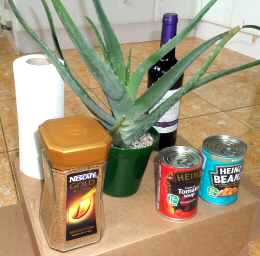 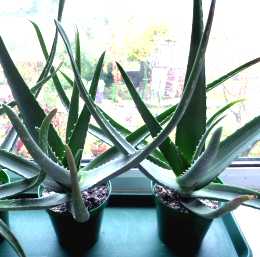
|
These are my small 'pup' aloe vera plants next to some kitchen items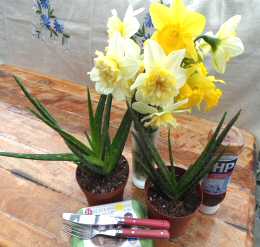 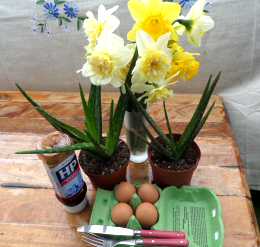 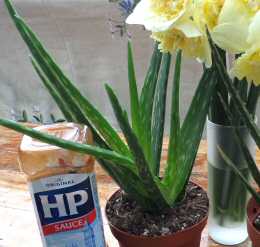
| These are my test purchases compared to a 50p and a 2p coin: Here's one I bought earlier from Ebay, cost Ł4 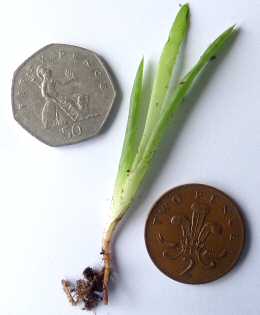 And here's one I bought from Gumtree, Ł4.50 + Ł1 p&p 
You can buy your own Aloe Vera plant by going to the order page. Thank you. |


